{article.title}
{article.body}
Posted at: {article.createdAt}
The features we listed at the end of the last page (loading state, error messaging, blank slate text) are common in most web apps. We wanted to see if there was something we could do to make developers' lives easier when it comes to adding them to a typical component. We think we've come up with something to help. We call them Cells. Cells provide a simpler and more declarative approach to data fetching. (Read the full documentation about Cells.)
In addition to these states, cells are also responsible for their own data fetching. This means that rather than fetching data in some parent component and then passing props down to the child components that need them, a cell is completely self-contained and fetches and displays its own data! Let's add one to our blog to get a feel for how they work.
When you create a cell you export several specially named constants and then Redwood takes it from there. A typical cell may look something like:
export const QUERY = gql`
  query FindPosts {
    posts {
      id
      title
      body
      createdAt
    }
  }
`

export const Loading = () => <div>Loading...</div>

export const Empty = () => <div>No posts yet!</div>

export const Failure = ({ error }) => (
  <div>Error loading posts: {error.message}</div>
)

export const Success = ({ posts }) => {
  return posts.map((post) => (
    <article key={post.id}>
      <h2>{post.title}</h2>
      <div>{post.body}</div>
    </article>
  ))
}
import type { FindPosts } from 'types/graphql'
import type { CellSuccessProps, CellFailureProps } from '@redwoodjs/web'

export const QUERY = gql`
  query FindPosts {
    posts {
      id
      title
      body
      createdAt
    }
  }
`

export const Loading = () => <div>Loading...</div>

export const Empty = () => <div>No posts yet!</div>

export const Failure = ({ error }: CellFailureProps) => (
  <div>Error loading posts: {error.message}</div>
)

export const Success = ({ posts }: CellSuccessProps<FindPosts>) => {
  return posts.map((post) => (
    <article key={post.id}>
      <h2>{post.title}</h2>
      <div>{post.body}</div>
    </article>
  ))
}
When React renders this component, Redwood will perform the QUERY and display the Loading component until a response is received.
Once the query returns, it will display one of three states:
Failure componentnull or empty array), the Empty componentSuccess componentThere are also some lifecycle helpers like beforeQuery (for manipulating any props before being given to the QUERY) and afterQuery (for manipulating the data returned from GraphQL but before being sent to the Success component).
The minimum you need for a cell are the QUERY and Success exports. If you don't export an Empty component, empty results will be sent to your Success component. If you don't provide a Failure component, you'll get error output sent to the console.
A guideline for when to use cells is if your component needs some data from the database or other service that may be delayed in responding. Let Redwood worry about juggling what is displayed when and you can focus on the happy path of the final, rendered component populated with data.
:::tip Wait... what are those types?
Redwood comes with some built-in utility types. You can see two of them in the example above: CellSuccessProps and CellFailureProps. Read more about them here.
Also notice the FindPosts type imported from types/graphql. This and other types are generated for you automatically—when you have the dev server running—based on the GraphQL query in your Cell. More about generated types here.
:::
Usually in a blog the homepage will display a list of recent posts. This list is a perfect candidate for our first cell.
:::info Wait, don't we already have a home page?
We do, but you will generally want to use a cell when you need data from the database. A best practice for Redwood is to create a Page for each unique URL your app has, but that you fetch and display data in Cells. So the existing HomePage will render this new cell as a child.
:::
As you'll see repeatedly going forward, Redwood has a generator for this feature! Let's call this the "Articles" cell, since "Posts" was already used by our scaffold generator, and although the names won't clash (the scaffold files were created in the Post directory), it will be easier to keep them straight in our heads if the names are fairly different from each other. We're going to be showing multiple things, so we'll use the plural version "Articles," rather than "Article":
yarn rw g cell Articles
This command will result in a new file at /web/src/components/ArticlesCell/ArticlesCell.{jsx,tsx} (and test.{jsx,tsx} mock.{js,ts} and stories.{jsx,tsx} files—more on those in chapter 5 of the tutorial!). This file will contain some boilerplate to get you started:
``jsx title="web/src/components/ArticlesCell/ArticlesCell.jsx"
export const QUERY = gql
query ArticlesQuery {
articles {
id
}
}
`
export const Loading = () =>
export const Empty = () =>
export const Failure = ({ error }) => (
)
export const Success = ({ articles }) => { return (
</TabItem>
<TabItem value="ts" label="TypeScript">

```jsx title="web/src/components/ArticlesCell/ArticlesCell.tsx"
import type { ArticlesQuery } from 'types/graphql'
import type { CellSuccessProps, CellFailureProps } from '@redwoodjs/web'

export const QUERY = gql`
  query ArticlesQuery {
    articles {
      id
    }
  }
`

export const Loading = () => <div>Loading...</div>

export const Empty = () => <div>Empty</div>

export const Failure = ({ error }: CellFailureProps) => (
  <div style={{ color: 'red' }}>Error: {error.message}</div>
)

export const Success = ({ articles }: CellSuccessProps<ArticlesQuery>) => {
  return (
    <ul>
      {articles.map((item) => {
        return <li key={item.id}>{JSON.stringify(item)}</li>
      })}
    </ul>
  )
}
:::info Indicating Multiplicity to the Cell Generator
When generating a cell you can use any case you'd like and Redwood will do the right thing when it comes to naming. These will all create the same filename (web/src/components/BlogArticlesCell/BlogArticlesCell.{jsx,tsx}):
yarn rw g cell blog_articles
yarn rw g cell blog-articles
yarn rw g cell blogArticles
yarn rw g cell BlogArticles
You will need some kind of indication that you're using more than one word: either snake_case (blog_articles), kebab-case (blog-articles), camelCase (blogArticles) or PascalCase (BlogArticles).
Calling yarn redwood g cell blogarticles (without any indication that we're using two words) will generate a file at web/src/components/BlogarticlesCell/BlogarticlesCell.{jsx,tsx}.
:::
To get you off and running as quickly as possible the generator assumes you've got a root GraphQL query named the same thing as your cell and gives you the minimum query needed to get something out of the database. In this case the query is named articles:
``jsx title="web/src/components/ArticlesCell/ArticlesCell.jsx"
export const QUERY = gql
query ArticlesQuery {
// highlight-next-line
articles {
id
}
}
`
</TabItem>
<TabItem value="ts" label="TypeScript">

```jsx title="web/src/components/ArticlesCell/ArticlesCell.tsx"
export const QUERY = gql`
  query ArticlesQuery {
    // highlight-next-line
    articles {
      id
    }
  }
`
However, this is not a valid query name for our existing Posts SDL (api/src/graphql/posts.sdl.{js,ts}) and Service (api/src/services/posts/posts.{js,ts}). (To see where these files come from, go back to the Creating a Post Editor section in the Getting Dynamic part.) Redwood names the query elements after the cell itself for convenience (more often than not you'll be creating a cell for a specific model), but in this case our cell name doesn't match our model name so we'll need to make some manual tweaks.
We'll have to rename them to posts in both the query name and in the prop name in Success:
``jsx title="web/src/components/ArticlesCell/ArticlesCell.jsx"
export const QUERY = gql
query ArticlesQuery {
// highlight-next-line
posts {
id
}
}
`
export const Loading = () =>
export const Empty = () =>
export const Failure = ({ error }) => (
)
// highlight-next-line export const Success = ({ posts }) => { return (
</TabItem>
<TabItem value="ts" label="TypeScript">

```jsx title="web/src/components/ArticlesCell/ArticlesCell.tsx"
import type { ArticlesQuery } from 'types/graphql'
import type { CellSuccessProps, CellFailureProps } from '@redwoodjs/web'

export const QUERY = gql`
  query ArticlesQuery {
    // highlight-next-line
    posts {
      id
    }
  }
`

export const Loading = () => <div>Loading...</div>

export const Empty = () => <div>Empty</div>

export const Failure = ({ error }: CellFailureProps) => (
  <div style={{ color: 'red' }}>Error: {error.message}</div>
)

// highlight-next-line
export const Success = ({ posts }: CellSuccessProps<ArticlesQuery>) => {
  return (
    <ul>
      // highlight-next-line
      {posts.map((item) => {
        return <li key={item.id}>{JSON.stringify(item)}</li>
      })}
    </ul>
  )
}
:::tip Using generated types
At this point, you might see an error in your Cell while trying to import from types/graphql: "The type ArticlesQuery does not exist"
When you have the dev server (via yarn rw dev) running, the CLI watches files for changes and triggers type generation automatically, but you can trigger it manually too by running:
yarn rw g types
This looks at your Cell's QUERY and—as long as it's valid—tries to automatically create a TypeScript type for you to use in your code.
:::
Let's plug this cell into our HomePage and see what happens:
```jsx title="web/src/pages/HomePage/HomePage.jsx" import { Metadata } from '@redwoodjs/web'
// highlight-next-line import ArticlesCell from 'src/components/ArticlesCell'
const HomePage = () => {
return (
<>
)
}
export default HomePage
</TabItem>
<TabItem value="ts" label="TypeScript">

```jsx title="web/src/pages/HomePage/HomePage.tsx"
import { Metadata } from '@redwoodjs/web'

// highlight-next-line
import ArticlesCell from 'src/components/ArticlesCell'

const HomePage = () => {
  return (
    <>
      <Metadata title="Home" description="Home page" />
      // highlight-next-line
      <ArticlesCell />
    </>
  )
}

export default HomePage
The browser should actually show the id and a GraphQL-specific __typename properties for any posts in the database. If you just see "Empty" then return to the scaffold we created last time and add a couple. Neat!
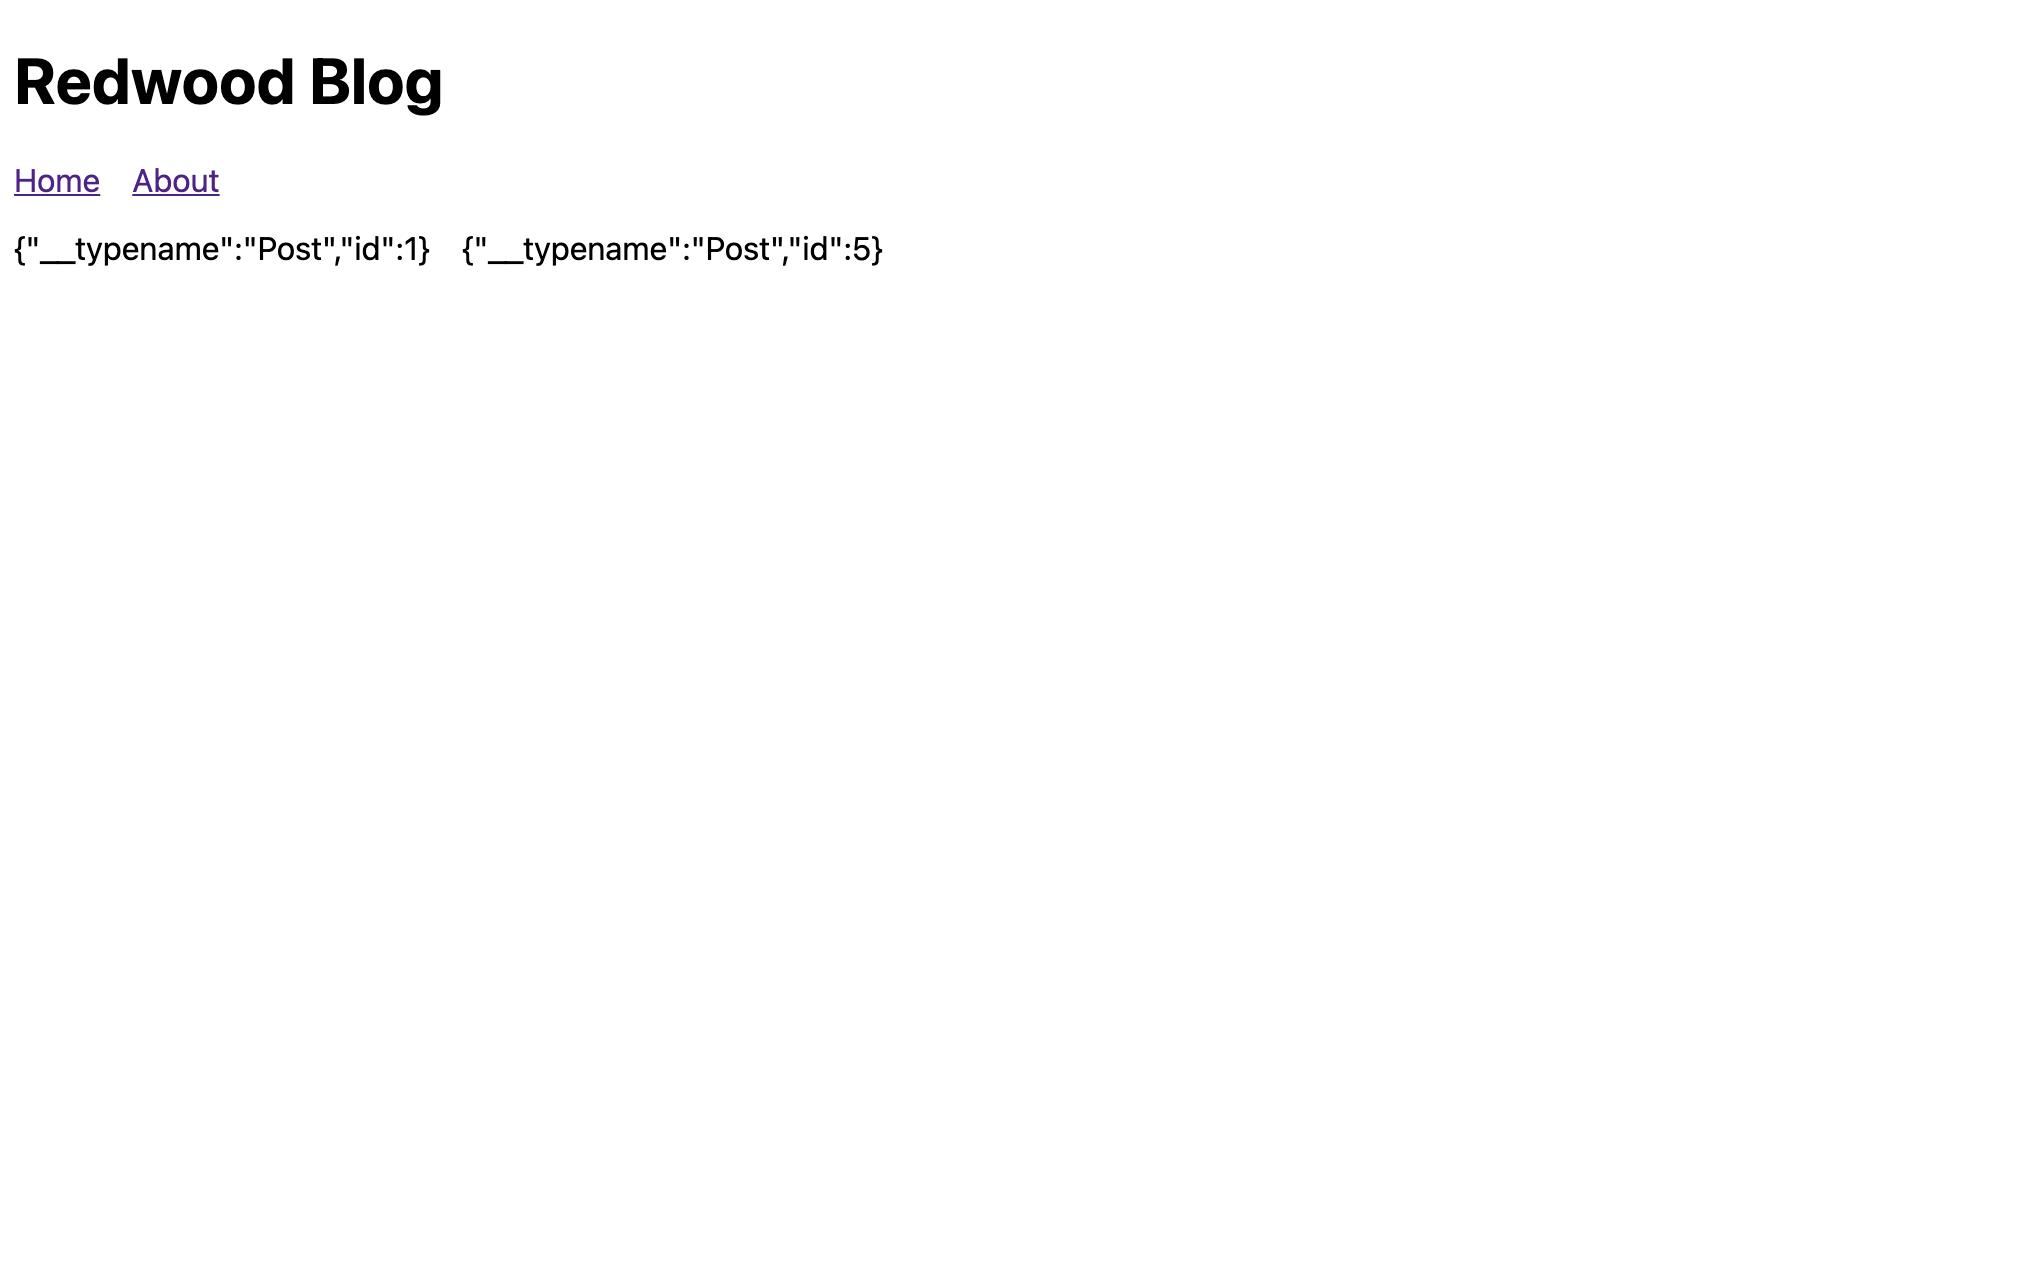
:::info
In the Success component, where did posts come from?
In the QUERY statement, the query we're calling is posts. Whatever the name of this query is, that's the name of the prop that will be available in Success with your data.
export const QUERY = gql`
  query ArticlesQuery {
    // highlight-next-line
    posts {
      id
    }
  }
`
export const QUERY = gql`
  query ArticlesQuery {
    // highlight-next-line
    posts {
      id
    }
  }
`
You can also alias the name of the variable containing the result of the GraphQL query, and that will be the name of the prop:
export const QUERY = gql`
  query ArticlesQuery {
    // highlight-next-line
    articles: posts {
      id
    }
  }
`
export const QUERY = gql`
  query ArticlesQuery {
    // highlight-next-line
    articles: posts {
      id
    }
  }
`
Now articles will be available in Success instead of posts:
export const Success = ({ articles }) => { ... }
export const Success = ({ articles }: CellSuccessProps<ArticlesQuery>) => { ... }
:::
In fact, let's use the aforementioned alias so that the name of our cell, and the data we're iterating over, is consistent:
``jsx title="web/src/components/ArticlesCell/ArticlesCell.jsx"
export const QUERY = gql
query ArticlesQuery {
// highlight-next-line
articles: posts {
id
}
}
`
export const Loading = () =>
export const Empty = () =>
export const Failure = ({ error }) => (
)
// highlight-next-line export const Success = ({ articles }) => { return (
</TabItem>
<TabItem value="ts" label="TypeScript">

```jsx title="web/src/components/ArticlesCell/ArticlesCell.tsx"
export const QUERY = gql`
  query ArticlesQuery {
    // highlight-next-line
    articles: posts {
      id
    }
  }
`

export const Loading = () => <div>Loading...</div>

export const Empty = () => <div>Empty</div>

export const Failure = ({ error }: CellFailureProps) => (
  <div style={{ color: 'red' }}>Error: {error.message}</div>
)

// highlight-next-line
export const Success = ({ articles }: CellSuccessProps<ArticlesQuery>) => {
  return (
    <ul>
      // highlight-next-line
      {articles.map((item) => {
        return <li key={item.id}>{JSON.stringify(item)}</li>
      })}
    </ul>
  )
}
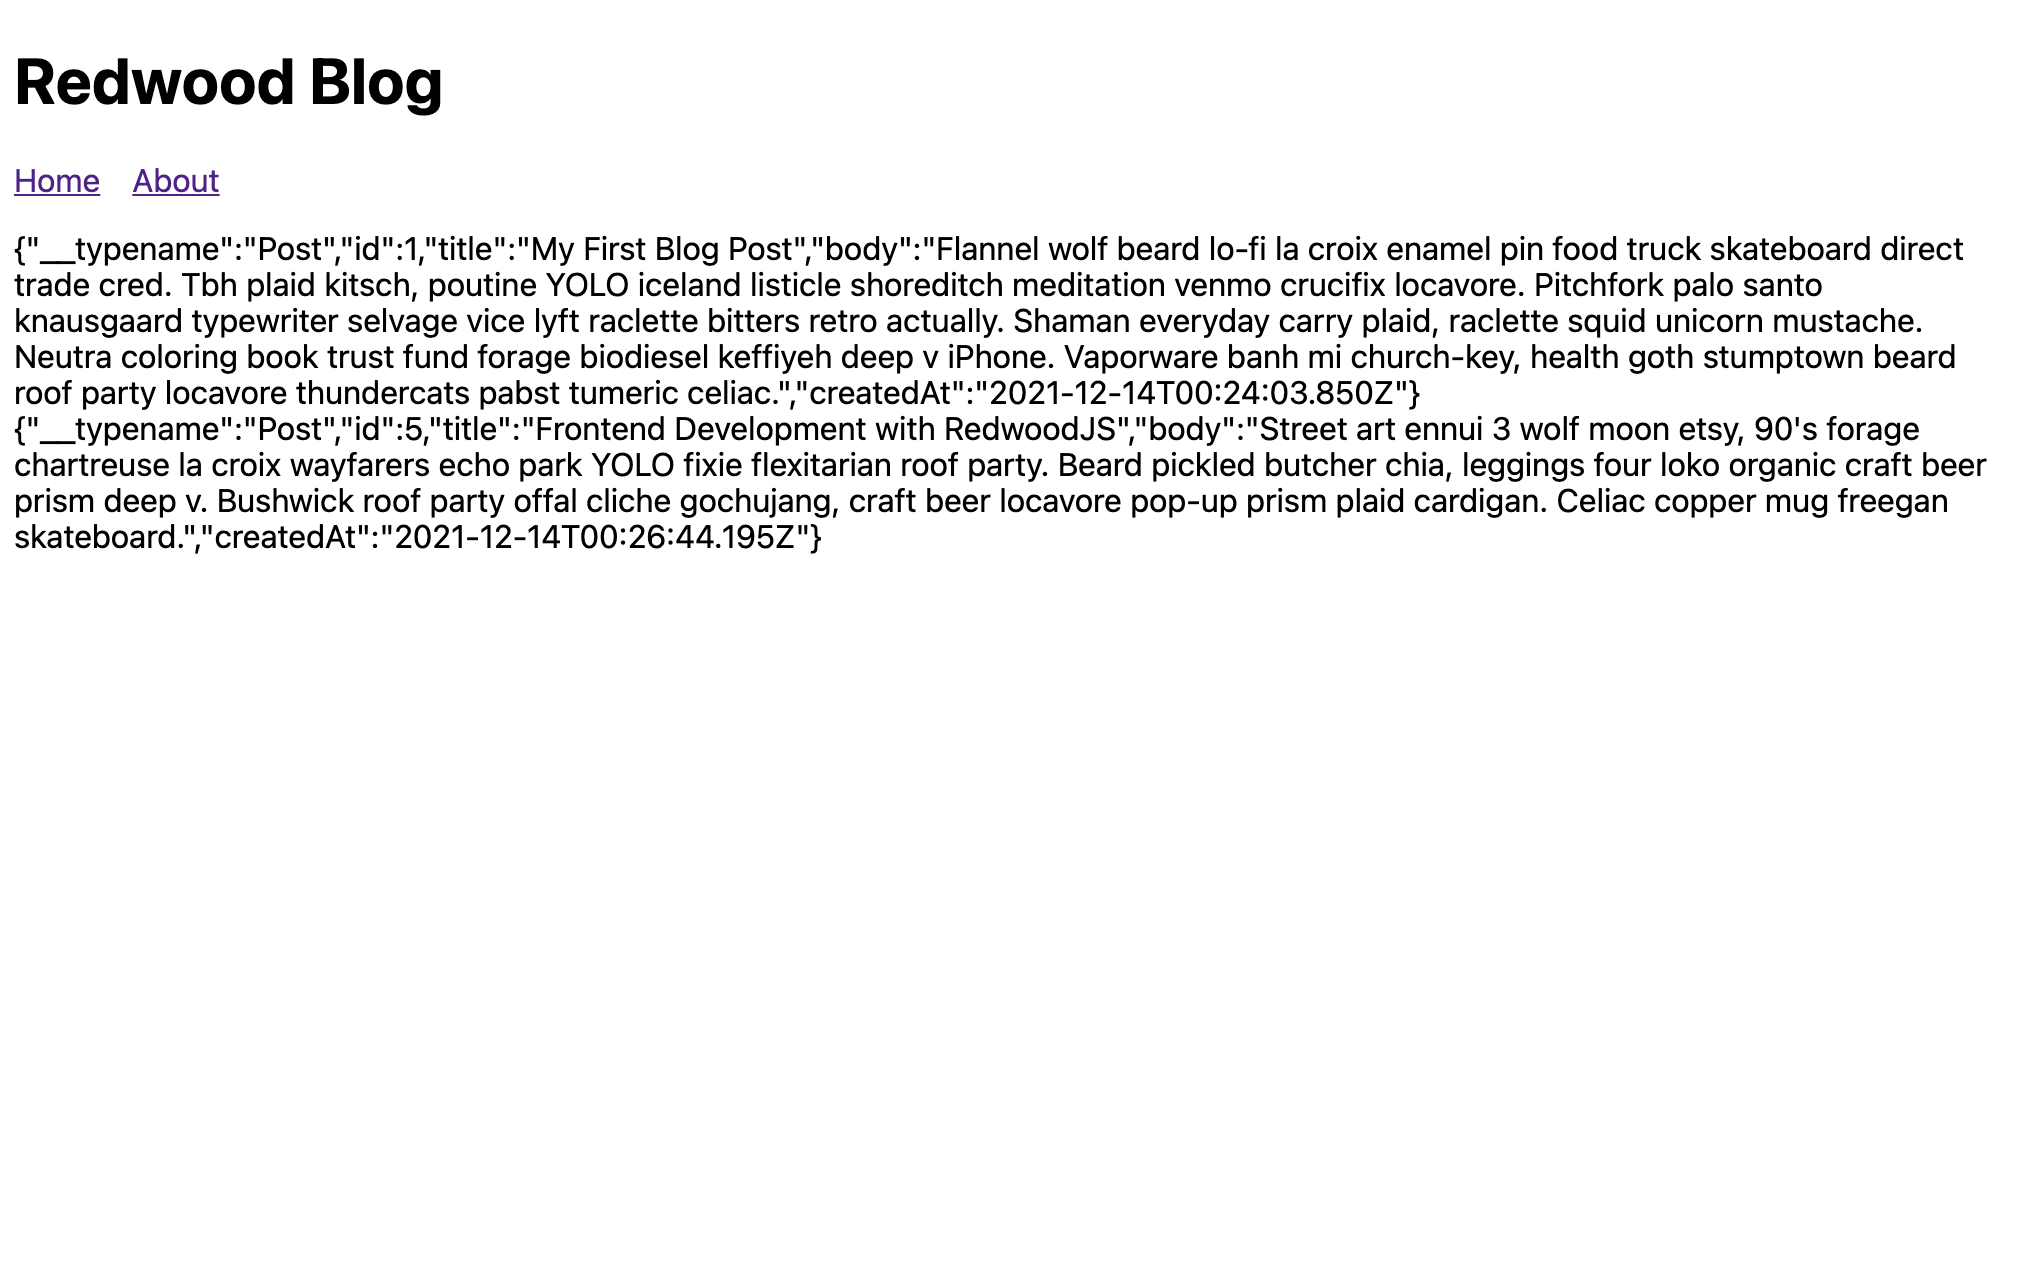
In addition to the id that was added to the query by the generator, let's get the title, body, and createdAt values as well:
``javascript title="web/src/components/ArticlesCell/ArticlesCell.jsx"
export const QUERY = gql
query ArticlesQuery {
articles: posts {
id
// highlight-start
title
body
createdAt
// highlight-end
}
}
`
</TabItem>
<TabItem value="ts" label="TypeScript">

```tsx title="web/src/components/ArticlesCell/ArticlesCell.tsx"
export const QUERY = gql`
  query ArticlesQuery {
    articles: posts {
      id
      // highlight-start
      title
      body
      createdAt
      // highlight-end
    }
  }
`
The page should now show a dump of all the data you created for any blog posts you scaffolded:
Now we're in the realm of good ol' React components, so just build out the Success component to display the blog post in a nicer format:
```jsx title="web/src/components/ArticlesCell/ArticlesCell.jsx"
export const Success = ({ articles }) => {
return (
// highlight-start
<>
{articles.map((article) => (
{article.body}{article.title}
Posted at: {article.createdAt}
// highlight-end
)
}
</TabItem>
<TabItem value="ts" label="TypeScript">

```tsx title="web/src/components/ArticlesCell/ArticlesCell.tsx"
export const Success = ({ articles }: CellSuccessProps<ArticlesQuery>) => {
  return (
    // highlight-start
    <>
      {articles.map((article) => (
        <article key={article.id}>
          <header>
            <h2>{article.title}</h2>
          </header>
          <p>{article.body}</p>
          <div>Posted at: {article.createdAt}</div>
        </article>
      ))}
    </>
    // highlight-end
  )
}
And just like that we have a blog! It may be the most basic blog that ever graced the internet, but it's something! You can create/edit/delete posts and the world can view them on the homepage. (Don't worry, we've got more features to add.)

To recap, what did we actually do to get this far?
The last few steps will become a standard lifecycle of new features as you build a Redwood app.
So far, other than a little HTML, we haven't had to do much by hand. And we especially didn't have to write a bunch of plumbing just to move data from one place to another. It makes web development a little more enjoyable, don't you think?
We're going to add some more features to our app, but first let's take a detour to learn about how Redwood accesses our database and what these SDL and services files are for.